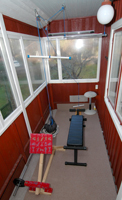


I go to a real gym a couple of times a week, but sometimes I don't have the time or energy to get there, but really need to get rid of the tension that builds up after a long day at the keyboard. I looked at multi-purpose machines but they were expensive and not as flexible as I would like, so I built the gym you see in the picture. Nothing terribly clever, but maybe it will show you how simple a home gym project can be. Mine is permanent, but it could be put away and reassembled in a few minutes leaving just the screw hooks in the wall and ceiling. I had most of the bits in my toy box, but buying all the string and pulleys would maybe cost $20. The bench and free weights were all I needed to buy.
The rowing rope goes from the handle, through the redirect pulley, and up to the support pulley in the ceiling, then down to a backpack containing a starter motor from a Saab 900 (other models should work too...). The weight is connected to the rope through one of those springy things that sailors use for mooring their boats, to absorb the inertial shock when you first start pulling (luxury option).
The pull-down rope is a little more complicated because I wanted the weight to increase as I pull it down. That way I can get a heavier workout by pulling further, and it means other people could more easily use it. To achieve this I anchored one end of the rope, redirected it through a fixed pulley 1 meter away, and then down to the weighted backpack. I then put a running pulley on the rope between the fixed pulleys, and attached that to a rope with the bar on the end. As I start to pull on the rope, the V between the fixed pulleys is almost flat and so the mechanical advantage is high, and it is easy to lift the weight. But as the angle gets smaller, the advantage reduces and the weight seems heavier. The exact starting and ending forces depend on the weight in the bag, the separation of the fixed pulleys, the efficiency of the pulleys, and the type of string used. Finding the best combination of these took some time. Using efficient pulleys is not neccesarily a good thing, it just means that you need a heavier weight in the bag. In fact I tried an expensive sailing pulley which melted, I suppose because they are not designed for continuous movement. A cheap pulley from the hardware store worked better.
Well, I hope this gives you some ideas, or at least inspires you to start a project that you may have thought was too difficult.
© Mark Harris 2006, but feel free to distribute without changes.