Also available in swedish
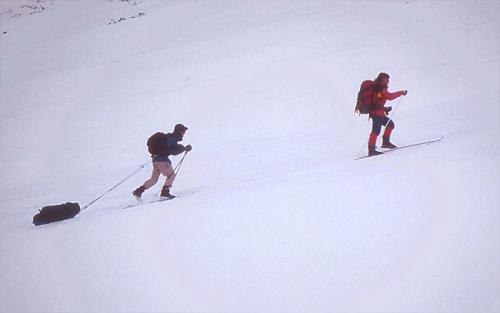
Early into a ski tour in Lappland I developed a knee problem that prevented me from carrying my 45lb pack. The emergency sled that I built at the bus stop in the little town of Jokkmokk has since followed me 200 miles, and will no doubt become a standard part of my winter kit. It is stable even on steep descents and traversing slopes. It easily takes an 80l pack with a 70lb load, and if the pack is mounted with the shoulder straps uppermost, the whole assembly can quickly be swung up on the back and worn as normal for traversing difficult terrain and towns.
Here I describe the simple design for those of you who have considered using a sled but have been put off by the cost, size and weight of commercial designs. Materials cost around $10, weight is under 3lb, and it took 30 mins to build with a Swiss army knife.
And why was it seen on TV ? Well, the BBC's Tomorrow's World program had a show on practical uses of the internet
(28 April '99), and featured some guys who planned their trip
through the web, and built this sled to take with them. Neat, huh ?
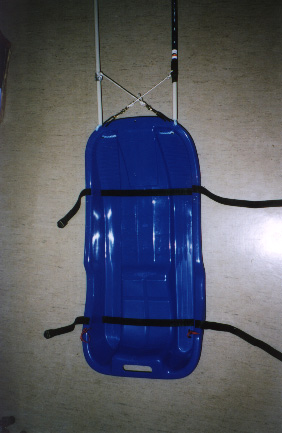
A standard child's plastic sled, as flat as possible.
2 x 1.5m x 13mm plastic electrical insulation pipe (conduit)
5m x 6mm nylon rope
1m x 3mm nylon string
2 x 20mm keyrings
2 x snap hooks
2 x 1.5m x 15mm nylon straps
Cut out holes a-d on the front edge of the sled, with a and d as close to the
edge as possible so that the arms can be folded back when not in use. Thread the
nylon rope through the holes a-b c-d and the conduits, and knot the ends through the
keyrings, as close as possible to the conduits to minimise slack when going downhill.
Fasten the strings for the cross members about 1 foot along the conduits at e and f,
using glue or tape to stop them sliding towards the sled. Tie the other ends to the
sled at g and h with knots that can be undone when the arms are folded back.
4 inches of string through holes i-l hold the arms in the folded position.
The cross members are important for stability when traversing slopes.
Cut slots m-t and thread through the belts that hold the luggage, and your sled is
complete.
The simplest waist belt consists of 18 inches of nylon rope tied at both ends to
18 inches of elastic rope with snap hooks at the junctions. If the elastic half is
worn in front, one avoids both start-up jerks and over-run downhill.
The belt is worn as low on the hips as possible.
An alternative design had elastic ropes through the sled arms, and a webbing belt,
but I found the give to be excessive. However, if you want to use your backpack
waist belt for attachment, elastic rope might be a good solution.
A delux Mark-II version of the sled was also
built with foldable arms and fixed cross beam, but wasn't really worth the extra effort.
For a simpler design, see Johan Lundström's page
And don't miss Ralf Hennenhöfer's very nice engineering, using crutches for arms, and a very solid axel across the front of the sled.
He also combines elastic cord with slightly longer rope to limit stretch.
Nor Michael Krabach's sled.
For an almost exact copy of mine, see Wolfgang Reinelt's page
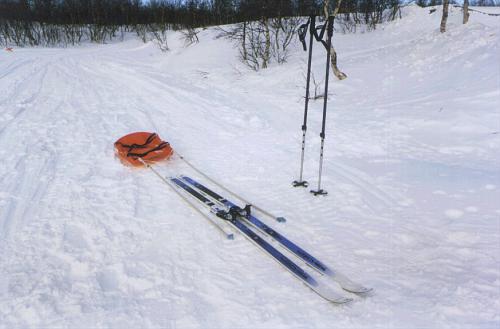
Donne Flanagan's sled has skis for runners to reduce friction.
Thanks for the feedback guys.
Pernilla has now followed me another 60 miles, with some small but useful
modifications. Firstly I fixed the Mark-II cross beam more securely with wire,
and this gave much more traverse stability, though I didn't realise quite how
much until I tore out those wires whilst brutally crashing through some trees
in a desperate attempt to catch the last train out of Katterat. Then I noticed
that she rolled more easily on steep slopes, though not because of reduced torsional
stability, but because the front could run downhill more, and the next tug on
the arms pulled the bottom under the rest of the sled, inducing the roll.
I also custom-made a cover, with holes for the arms so that the elastic
drawstring could be securely fastened around the lip of the sled, keeping out
all snow.
Because I was camping for part of the trip, I had a lot more stuff than
really fitted on the sled, and in particular I had two big matresses on top,
giving a high triangular profile to the load. This I thought would be a problem,
but in fact led to self-righting behaviour. After I had broken the cross-beam
I had several turn-overs on fast, icy, downhill traverses (this was bad territory
for a sled), but every time it popped up again, presumably because the height
prevented complete inversion, and the heavier load nearer the sled had a
natural tendency to be lowest. Maybe I'll deliberately load this way in future.

© Mark Harris 1999, but feel free to distribute without changes.
I would love to have feedback. Please leave your comments in the guestbook.