A home-made light-operated camera trigger using the stamp microprocessor (camera trap)
Introduction
This device is a replacement for the original CamTrig.

 It is more expensive (around $150 for parts instead of $30), but is
easier to construct, and vastly more flexible since it is based on
a programmable microcontroller that can have new functions
downloaded from a computer instead of having to build with more hardware.
Update 2014 : I now use the Arduino microcontroller that costs $20, so this version is now cheaper than my original 'cam_trig' built with discrete components.
Maybe one day I'll write it up, but since there are so many write-ups of similar Arduino devices, motivation is low...
The device is built around the Stamp microprocessor from Parallax,
which was chosen because it so so easy to get started with, and can be programmed in a form of BASIC.
It's a very popular processor with robot hobbyists, so there's also
plenty of support available on the web.
I bought mine in Sweden from Lawicel.
Features
- Backlit LCD for easy viewing in the dark
- Programmable delay between beam interupt and camera triggering
- Laser can be switched off before taking picture
- Unlimited expandability
Principles
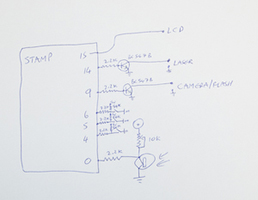
The principles are very simple - the Stamp is a microprocessor that you can program
via a USB connection to your home computer, and that program
controls the voltage on a bunch of output pins depending on what is happening
at a bunch of input pins. In the simplest case here, phototransistors are connected
to input pins 0 and 1, and when light stops falling on the sensors, the voltage on that pin drops.
This causes the program to respond by waiting a predetermined length of time, and then
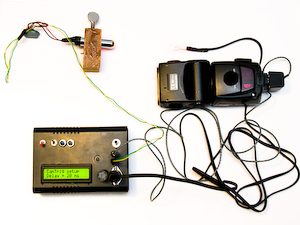
raising the voltage on output pin 9, which is connected to a camera or flashgun via
a transistor (whose job is simply to protect the processor from possible damage
from high currents through the flashgun).
At the same time the program drops the voltage on pin 14,
which is connected to the laser that is used for the controlling beam, thus avoiding it appearing in the final photograph.
Then there is a switch on pin 4 that is monitored, and when it is pulled low the program switches
to displaying a delay-time menu on the LCD and monitoring pins 5 and 6, whose inputs
are used to increment the delay time by 1 or 10 ms respectively.
Parts list
- Parallax Board-of-education full USB kit (28803)
- Parallax 2x16 backlit serial LCD (27977)
- Parallax LCD extension cable (805-00011)
- 2x PNP Phototransistor
- 2x NPN transistor (eg BC547B)
- 4x 2.2K resistors
- 2x 10K potentiometers
- Assorted switches, sockets, wire, and a box
Construction
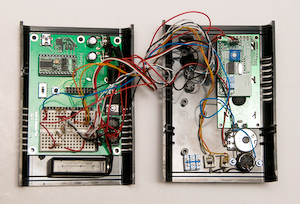
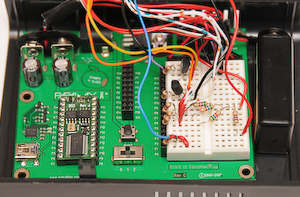
The Board-of-education kit includes a breadboard where small circuits can be built,
and this is where the transistors are connected, along with all the resistors that
drag the input pins to their default signal levels (normally high).
You can see in the diagrams and photographs how this has been done.
It may look complicated at first sight, but it's mostly just extension wires to connect
the switches and sockets to the board.
This is a still a work-in-progress (Nov 08, now May 11), so expect to see changes here, and feel
free to give suggestions. What I'm thinking about now is having a bunch of switches
and sockets connected to the unused pins, ready to be programmed on the fly later.
Programming
The Stamp processor comes with a BASIC editor for windows, but if you
have a Mac you will need something like
MacBS2
and the FTDI driver.
Here is the code for a simple variable-delay triggering of camera or flash after two laser beams are interrupted : PBASIC code.
Using the CamTrig Pro
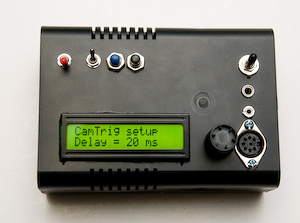
With the mode switch set to "setup", you can increment a delay between
the beam being interrupted and the triger signal being sent. The black
button increments by 10, the blue button by 1. Press both to reset to zero.
This will also toggle the backlighting on the LCD screen, which costs
60mA.
Hit both buttons twice to get back to the backlighting mode you were in.
The dials adjust the sensitivity of the sensors, so with the light
source hitting them, adjust so the display just says "On" for each sensor.
If you drive illuminating LEDs/Lasers from the 2.5mm socket, the power
to them will be switched off during the trigger, but if you don't need
this function you can increase battery life by powering them externally.
The 3.5mm trigger socket should be able to drive either a flash gun or a camera.
Although both beams must be broken to trigger, only one needs to make
the transition from light to dark - ie a bug can fly along one beam,
blocking it for a long time, and only when the second beam is broken
will the device trigger.
Fuel consumption
The processor contributes about 50mA, as does backlighting of the
screen and the pair of lasers that I use. A pair of LEDs takes 100mA, but of course your mileage will vary.
So it should run for several hours on a 9v 800mAh NiMH battery, but it doesn't. Hmmmm. Maybe just old batteries I have.
Here are a couple of pics taken with the device.


© Mark Harris 2010, but feel free to distribute without changes.
(MRH homepage)

 It is more expensive (around $150 for parts instead of $30), but is
easier to construct, and vastly more flexible since it is based on
a programmable microcontroller that can have new functions
downloaded from a computer instead of having to build with more hardware.
