If you buy the very expensive CamRanger (~350 USD) for wireless control of your camera, there is an (expensive) accessory available that allows you to also control the Bescor MP-101. Many people love the CamRanger, but I find the system unstable, and when it hangs the server needs to be restarted, which is pretty annoying when it's on a mast 12m up in the air.
An alternative (and better) solution for wirelessly controlling a camera is DDServer which is donationware and runs on the same hardware as the CamRanger (the TP-Link MR3040, which costs around 40 USD when bought without the CamRanger firmware installed). I also find the interface of DSLRDashboard much better than that on the CamRanger.
You need to be (or know) a little bit of a nerd to install the DDServer firmware on the TPlink MR3040, but you're getting a better product and saving 300 USD.
However, DSLRDashboard can't control the Bescor MP-101 head, which is crucial for the mast jobs that I do, which is why I was really happy when I found this simple solution to wirelessly controlling it.
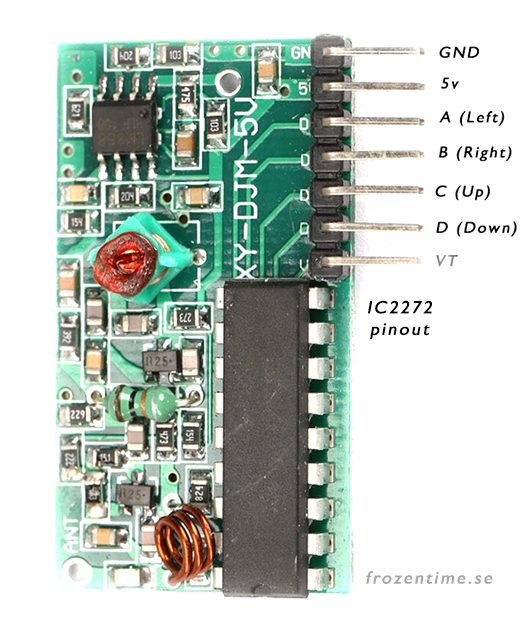
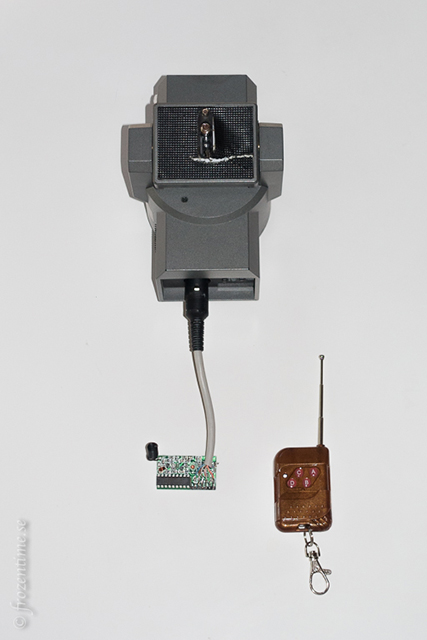
The IC2262/2272 is a wonderful system comprising a key fob with 4 buttons, and a tiny circuit board with 7 pins - power and ground plus a pin for each of the buttons (plus a pin that goes high when any of the buttons is pressed). And it needs the same 5v supply that the Bescor head uses, so you don't need an extra battery. The diagram shows the plug looking at the pins from the outside.
And that's it ! Couldn't be simpler.
But it can be more complicated, if you want, so I have actually put an arduino microprocessor between the 2272 and the head so that I can do more complicated things in the future (eg programmed panorama stitching).
But that's a story for another day (see below).
Another day :
The range of these remote controls is normally around 100m, but I found that was reduced significantly when I had the Bescor motor switched on,
presumably due to electromagnetic noise interfering with the radio signals.
The device still worked, but at longer distances the motor ran intermittently when a button was held constantly.
For this reason, plus future features, I added an arduino microcontroller between the receiver and the Bescor head, whose job was to create a one second pulse
each time a short signal was detected, thus smoothing out the noise (at the expense of the loss of a few degrees of positioning precision).
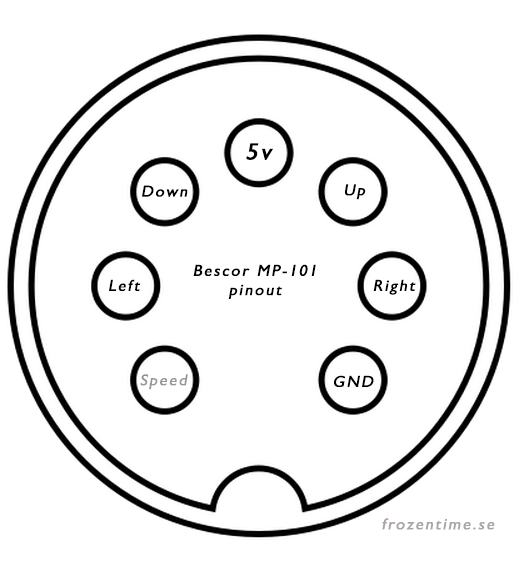
The wiring is pretty simple : Pins A,B,C, and D on the receiver are connected to Arduino input pins 8,9,10, and 11. VT is connected to pin 12, while ground and 5v are common to the Bescor, the receiver and the Arduino. Output pins 0, 1, 2 and 3 on the Arduino are connected to the 7-pin DIN going to the Bescor. I also added an LED to pin 5, as a confirmation lamp.
Here you can pick up the Arduino code
© Mark Harris 2016, but feel free to distribute without changes.